Wednesday, November 28, 2012

Make Your Own Deodorant

This is something I've been playing around with for a while. I hated the chemicals in commercial deodorants but I could never find any natural deodorants that actually worked for me. Either I stunk or I was sweating like a hog. Yep. 

Because I knew that the stink is from bacteria, I started using Tea Tree Oil and just rubbing a little on my armpits. This worked....for a little while. Until my armpits started itching like crazy. I realized it probably wasn't the best idea to put Tea Tree Oil directly on my skin. Besides, it didn't do much for the sweating. 

So, I started playing around with a few different recipes and came up with a concoction that has been working really well:

3/4c - 1c Coconut Oil
1/4c Baking Soda
5-10 drops Tea Tree Oil


Yes, that is a little boy's head peaking through in the background. :) 


 First, gather one or two deodorant containers. I've found that the solid deodorant containers are the only ones that I can get completely apart. Get as much of the deodorant out as possible and wash the containers with soap and water. Let dry completely.

 Heat the coconut oil until just melted and mix in the baking soda and tea tree oil.


As the mixture cools, mix every few minutes to help combine the baking soda and oils. 

Once the mixture cools into a 'spreadable' state, spoon into your deodorant containers. Because coconut oil has a melting point of 76 degrees, I like to keep the deodorant in the fridge to keep it in a more solid state.

It may take your body a few days to get used to this new deodorant so don't worry if it doesn't seem to work right away.

This deodorant melts almost the instant it touches your skin. I usually put it on right out of the shower and then let it dry before getting dressed so I don't get any on my clothes. Once it's dry, I haven't noticed any deodorant marks on my shirts like I did with the commercial deodorants.

**Common Sense Warning**
Please test on a small patch of skin before using as deodorant. If any reaction occurs, stop using immediately and wash the area.

Wednesday, September 26, 2012

Making Butter

I recently bought a case of organic whipping cream through a food co-op. At the time, I had planned to use it for our cupcakes at the farmers market. But, things didn't go as planned and I was only able to make it there once. Boo.

I could have freezed it to use for cooking later, but I wanted to get creative. A friend had told me about making butter with whipping cream by shaking a jar with a marble in in. As (un)lucky as I am, I really didn't want to combine shaking and glass so I broke out our mixer.


I chilled the bowl and beater in the fridge for a bit and the dumped in two pints of whipping cream. I turned the mixer on high for a few minutes. At first, it just turns into whipped cream but it just keeps getting thicker and thicker.


All of a sudden, the milk and solids start separating. I learned an important lesson at this point:

Stay next to your mixer during this process. If you are across the room when everything starts separating, the milk will splatter all over your counter, cupboards and walls!

Once it separates, drain away the milk (I kept the milk for cooking - it's pretty much just skim milk) and you need to 'wash' the butter. To do this, rinse the butter under cool water until the water is clear. You'll have to squeeze the butter while rinsing it to make sure all the milk washes off. If you don't do this, the butter will spoil faster. Store in the fridge in an air tight container.


I'm not entirely sure how long it will last in the fridge, but we used ours for two weeks without any issues.

Homemade Playdough

I decided to make playdough for little man this week. After a quick google search for Homemade Playdough, we were in business. I decided to use the recipes over at Moms Who Think.

I thought the no cook version would be the best because C would be able to help with it.

This is what we ended up with...
Hmmmm....

So, I decided to go with the cooked version...
 
Much better!

C's having a blast with it and has already requested some blue playdough.
 
 
It even keeps him busy while I work.

Although, I did end up with some playdough in my coffee.

This is the recipe from Moms Who Think that I used:

Ingredients:
1 cup flour
1/2 cup salt
1 cup water
1 Tablespoon oil
2 teaspoons cream of tartar
Food coloring by drops
Directions:
1. Combine all ingredients in a pan and stir. Cook over low heat, stirring until a ball forms.
2. Add food coloring and mix thoroughly until desired color.
3. Cool on foil. Store in covered container.

Wednesday, September 5, 2012

Slow Cooker Swiss Steak

4-5 Tomatoes, sliced

2-3 Green Peppers, sliced
1 Onion, sliced
Cubed Round Steaks
Flour
Salt & Seasonings (I used pepper, garlic powder and sea salt)
Oil (I love olive or coconut oil)                    

Heat a dash of oil in skillet. Dredge steaks in flour and seasoning. Brown steaks on each side in skillet. Steaks do not need to be cooked through, just brown enough to get a good crust on the outside.
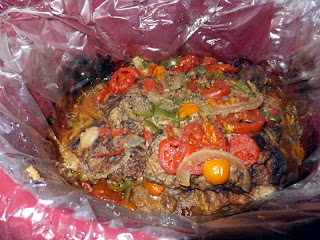
Layer steaks in slow cooker with tomato, onion and pepper slices.
If you’d like a little extra taste, add a little broth or water to the skillet and scrape up any leftover bits. Then pour over the steaks and vegetables in the slow cooker.
Cook on low for 5-6 hours. This is delicious served over brown rice.  
You'll need more veggies than this! I had to dig in the fridge and pull out some cherry tomatoes to add in!

Mmm!

Everything's ready to go.

Okay, it doesn't look really pretty right now but, trust me, it's delicious. All of the juices from the veggies makes the meat super tender.